代理模式
代理模式
为其他对象提供一中代理以控制对这个对象的访问
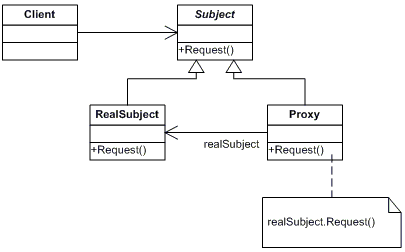
类图

- Proxy
- 保存一个引用是的代理可以访问实体,若RealSubject和Subject的接口相同,Proxy会引用Subject
- 提供一个与Subject的接口相同的接口,这样代理就可以用来替换实体
- 控制对实体的存取,并可能负责创建和删除它
- 其他功能依赖于代理的类型
- Remote Proxy负责对请求及其参数进行编码,并向不同地址空间中的实体发送已编码的请求
- Virtual Proxy可以缓存实体的附加信息,以便延迟对它的访问。
- Protection Proxy 检查调用者是否具有实现一个请求所必须的访问权限。
- Subject
- 定义RealSubject和Proxy的公用接口,这样就在任何使用RealSubject的地方都可以使用Proxy
- RealSubject
- 定义Proxy所代表的实体
优缺点
- Proxy模式在访问对象时引入了一定程序的间接性,根据代理的类型,附加的间接性有多种用途:
- Remote Proxy可以隐藏一个对象存在于不同地址空间的事实
- Virtual Proxy可以进行最优化,例如根据要求创建对象
- Protection Proxies和Smart Reference都允许在访问一个对象时有一些附加的内务处理
实例
- 动态代理 Proxy#newProxyInstance(spring用的太多了)
- aop
动态代理
jdk动态代理
interface Booker {
    void book();
}

class TripTicketBooker implements Booker {

    @Override
    public void book() {
        System.out.println("book a trip ticket");
    }
}

class TransactionalInvocationHandler implements InvocationHandler {

    private Object target;

    TransactionalInvocationHandler(Object target) {
        this.target = target;
    }

    @Override
    public Object invoke(Object proxy, Method method, Object[] args) throws Throwable {
        System.out.println("begin transaction");
        Object object = method.invoke(target, args);
        System.out.println("end transaction");
        return object;
    }
}

public class JdkDynamicProxyTest {

    @Test
    public void dynamicProxyTest() throws InterruptedException {
        // 下边这行代码是保存动态生成的类,我这不知怎么的不好使
        // 我下边是通过debug,然后把动态生成的类信息对应的byte数组自己alt + f8动态运行搞到文件里的。
        // System.getProperties().put("sun.misc.ProxyGenerator.saveGeneratedFiles", "true");
        Booker booker = new TripTicketBooker();
        Class clazz = booker.getClass();
        Booker bookerProxy = (Booker) Proxy.newProxyInstance(clazz.getClassLoader(),
            clazz.getInterfaces(), new TransactionalInvocationHandler(booker));
        bookerProxy.book();
    }
}
- 生成的代理类
bookerProxy实现了Booker接口,继承自Proxy类 Proxy类含有一个InvocationHandler的属性,我们代码中InvocationHandler的实现为TransactionInvocationHandler- bookerProxy实现的Booker接口中的book方法,实际上是通过调用TransactionInvocationHandler的invoke方法实现的。
创建代理对象
首先看下Proxy.newProxyInstance方法签名:
public static Object newProxyInstance(ClassLoader loader, Class<?>[] interfaces, InvocationHandler h)
-
loader: the class loader to define the proxy class。 define代理类的类加载器
-
interfaces: the list of interfaces for the proxy class to implement。代理类要实现的接口们
-
h: the invocation handler to dispatch method invocations to。调用处理器
-
return: a proxy instance with the specified invocation handler of a proxy class that is defined by the specified class loader and that implements the specified interfaces。返回一个由指定的类加载器defined的、实现了指定接口的、具有指定调用处理器的代理类的实例(我英语学得不好)。
然后我们跟一下newProxyInstance方法,看下它是如何生成代理类的。只说关键方法Proxy$ProxyClassFactory.apply,其他的可以看下下边的线程栈。
java.lang.Thread.State: RUNNABLE
    at java.lang.reflect.Proxy$ProxyClassFactory.apply(Proxy.java:569)
    at java.lang.reflect.Proxy$ProxyClassFactory.apply(Proxy.java:557)
    at java.lang.reflect.WeakCache$Factory.get(WeakCache.java:230)
    - locked <0x31a> (a java.lang.reflect.WeakCache$Factory)
    at java.lang.reflect.WeakCache.get(WeakCache.java:127)
    at java.lang.reflect.Proxy.getProxyClass0(Proxy.java:419)
    at java.lang.reflect.Proxy.newProxyInstance(Proxy.java:719)
    at jdk.proxy.BookerProxy.bind(DynamicProxyTest.java:43)
    at jdk.proxy.DynamicProxyTest.dynamicProxyTest(DynamicProxyTest.java:60)
Proxy$ProxyClassFactory.apply
方法里会做这些事情:
- 校验传入的classLoader确实可以load传入的interfaces
- 校验传入的interfaces确实是interface
- 校验传入的interfaces中没有重复
- 校验是否含有不同包中的非public的接口
- 拼接代理类类名
- 生成代理类
下为代码(代码没动,格式有调整):
private static final class ProxyClassFactory
    implements BiFunction<ClassLoader, Class<?>[], Class<?>>
{
    // jdk.proxy.$Proxy2 或者 com.sun.proxy.$Proxy50熟悉么
    // $Proxy和数字就是下边这两个字段
    private static final String proxyClassNamePrefix = "$Proxy";
    private static final AtomicLong nextUniqueNumber = new AtomicLong();

    @Override
    public Class<?> apply(ClassLoader loader, Class<?>[] interfaces) {

        Map<Class<?>, Boolean> interfaceSet = new IdentityHashMap<>(interfaces.length);
        for (Class<?> intf : interfaces) {
            Class<?> interfaceClass = null;
            try {
                interfaceClass = Class.forName(intf.getName(), false, loader);
            } catch (ClassNotFoundException e) {
            }
            // 验证loader是否确实可以load这些interfaces
            if (interfaceClass != intf) {
                throw new IllegalArgumentException(intf + " is not visible from class loader");
            }
            // 验证你传入的class是否是接口
            if (!interfaceClass.isInterface()) {
                throw new IllegalArgumentException(interfaceClass.getName() + " is not an interface");
            }
            // 验证是否传入的interfaces是否有重复
            if (interfaceSet.put(interfaceClass, Boolean.TRUE) != null) {
                throw new IllegalArgumentException("repeated interface: " + interfaceClass.getName());
            }
        }

        String proxyPkg = null;     // package to define proxy class in
        int accessFlags = Modifier.PUBLIC | Modifier.FINAL;

        for (Class<?> intf : interfaces) {
            int flags = intf.getModifiers();
            if (!Modifier.isPublic(flags)) {
                accessFlags = Modifier.FINAL;
                String name = intf.getName();
                int n = name.lastIndexOf('.');
                String pkg = ((n == -1) ? "" : name.substring(0, n + 1));
                if (proxyPkg == null) {
                    proxyPkg = pkg;
                } else if (!pkg.equals(proxyPkg)) {
                    throw new IllegalArgumentException("non-public interfaces from different packages");
                }
            }
        }

        if (proxyPkg == null) {
            proxyPkg = ReflectUtil.PROXY_PACKAGE + ".";
        }

        long num = nextUniqueNumber.getAndIncrement();
        // 拼接代理类的类名
        String proxyName = proxyPkg + proxyClassNamePrefix + num;
        // 生成代理类字节数组
        byte[] proxyClassFile = ProxyGenerator.generateProxyClass(proxyName, interfaces, accessFlags);
        try {
            // 生成代理类
            return defineClass0(loader, proxyName, proxyClassFile, 0, proxyClassFile.length);
        } catch (ClassFormatError e) {
            throw new IllegalArgumentException(e.toString());
        }
    }
}
生成的代理类
通过debug,我们在defineClass0处打个断点,通过idea的alt + F8,动态运行new FileOutputStream("/Users/lichuangjian/Proxy.class").write(proxyClassFile),就可以在目录下/Users/lichuangjian/Proxy.class看到生成的代理类了。
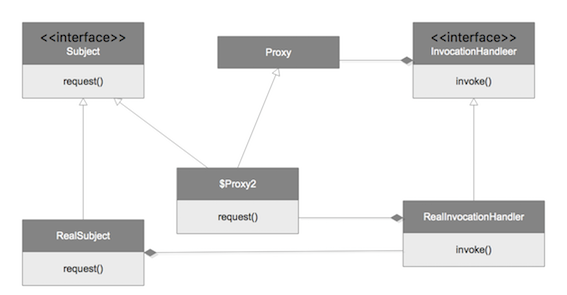
- 代理类$Proxy2继承自Proxy,实现了Booker接口
- $Proxy2的方法执行实际是通过内部的InvocationHandler(是Proxy的一个属性)来执行的。
- 代理类是final
具体的类图如下: 
生成的代理类具体如下:
package jdk.proxy;

import java.lang.reflect.InvocationHandler;
import java.lang.reflect.Method;
import java.lang.reflect.Proxy;
import java.lang.reflect.UndeclaredThrowableException;
import jdk.proxy.Booker;

final class $Proxy2 extends Proxy implements Booker {
    private static Method m1;
    private static Method m3;
    private static Method m2;
    private static Method m0;

    public $Proxy2(InvocationHandler var1) throws  {
        super(var1);
    }

    public final boolean equals(Object var1) throws  {
        ....
    }

    public final void book() throws  {
        try {
            // h是InvocationHandler的实例,因为$Proxy2
            super.h.invoke(this, m3, (Object[])null);
        } catch (RuntimeException | Error var2) {
            throw var2;
        } catch (Throwable var3) {
            throw new UndeclaredThrowableException(var3);
        }
    }

    public final String toString() throws  {
        ....
    }

    public final int hashCode() throws  {
        ....
    }

    static {
        try {
            m1 = Class.forName("java.lang.Object").getMethod("equals", new Class[]{Class.forName("java.lang.Object")});
            m3 = Class.forName("jdk.proxy.Booker").getMethod("book", new Class[0]);
            m2 = Class.forName("java.lang.Object").getMethod("toString", new Class[0]);
            m0 = Class.forName("java.lang.Object").getMethod("hashCode", new Class[0]);
        } catch (NoSuchMethodException var2) {
            throw new NoSuchMethodError(var2.getMessage());
        } catch (ClassNotFoundException var3) {
            throw new NoClassDefFoundError(var3.getMessage());
        }
    }
}
cglib代理
先上代码例子:
class TransactionalMethodInterceptor implements MethodInterceptor {

    public Object intercept(Object obj, Method method, Object[] objects, MethodProxy methodProxy) throws Throwable {
        System.out.println("begin transaction");
        Object result = methodProxy.invokeSuper(obj, objects);
        System.out.println("end transaction");
        return result;
    }
}

class CglibBooker {
    synchronized void book() {
        System.out.println("book a trip ticket");
    }
}

public class CglibProxyTest {
    @Test
    public void cglibProxy() {
        // 这步会把cglib生成的代理类,生成在这个目录下,便于我们使用反编译工具查看。
        System.setProperty(DebuggingClassWriter.DEBUG_LOCATION_PROPERTY, "/Users/lichuangjian/");
        TransactionalMethodInterceptor methodInterceptor = new TransactionalMethodInterceptor();
        CglibBooker cglibBooker = new CglibBooker();
        Enhancer enhancer = new Enhancer();
        enhancer.setSuperclass(cglibBooker.getClass());
        enhancer.setCallback(methodInterceptor);
        CglibBooker bookerProxy = (CglibBooker) enhancer.create();
        bookerProxy.book();
    }
}
生成的代理类,继承自net.sf.cglib.proxy.Factory,实现了CglibBooker接口。
代理模式与装饰器模式
参考

